
DIY Toilet Room Makeover: A Colourful, Vintage-Inspired Transformation showcasing Bold Vintage Wallpaper

If you're looking for inspiration for a small toilet room makeover, you're in the right place. Today I’m sharing how I gave our tiny bathroom a colourful, vintage-inspired refresh—perfect for those who love retro charm and practical design.

Let’s start with the “before.” Our toilet room was basic—white tiles, white walls, and very little personality. While clean-looking, it felt stark and cold. The tiled walls constantly collected dust, and the grey floor tiles I had previously installed (over the original orange ones) only made the space look dull. They also showed every speck of dirt, especially around the caulking. The window sill didn’t help either—it was another major dust trap.
It was definitely time for a change.
I began this DIY toilet room makeover by researching new floor tiles. Because the old ones were glued down with Liquid Nails, removing them would’ve been messy and difficult. I knew I’d need to install new tiles over the existing ones and find the thinnest option possible to avoid issues with the door catching.
My first attempt was a set of black and white patterned tiles from Temu, but they just didn’t suit the space. After a bit more searching, I found the perfect solution: Senso floor tiles in Cherrybark from Bunnings.

I loved that they were a warmer wood colour. One box was going to be enough to cover my floor which was 1.52 x .89m = 1.3528m2. I did stuff up cutting a few boards so it was lucky I had more. And being 2mm thick was a bonus.

These darker floor tiles instantly warmed and added depth to the room’s overall look. They were easy to cut and adhered strongly to the existing surface. I was genuinely impressed with the quality and texture of these peel-and-stick tiles, making them a great choice for a quick and stylish bathroom update.

I did find the door was catching slightly on one side but hubby shaved a bit off the bottom of the door and it closed fine and you can't even notice.
In hindsight I would stagger the lengths of the floorboards instead of laying them in a straight row. But this could always be fixed in the future if it becomes too annoying, but after a few weeks I haven't really noticed the layout.

Next I started planning the walls. I knew I wanted wallpaper on the top half of the walls, and to cover the bottom tiles.
I had some sheeting from the mdf I removed from the entry way which was a good height and I could fill the rest in with trim.
So I did the calculations. The lower walls were 126cms high x 155 wide and 88 wide.
My sheets were the right width, but they were only 115cms high.


To fill the other 11cms, I used base boards that were 6.6cms high and top moulding that was 4.2cms high.

Next I tested out a colour from Porters paints called Timberline on my MDF wall sheeting.

However, when I was finished we all agreed it was a bit dark. Especially given it is a very small room.

Following which I tried Porter's Olive Grove. I had originally looked at the 3 greens above. Bayleaf was too bright but the Olive Grove brought in a more muted green.

I tested it on the small board at the back of the toilet and it worked a lot better.

So I removed all my panels which were adhered with double sided tape and repainted them in Olive Green. I set up some blocks in the living room so I could work on them easily with a roller.

I also wanted to update the window treatment with a new curtain—something neutral, but not white. I came across a linen-style option with tassels on Temu that fit the vintage feel I was going for. While I liked the texture and detailing, it ended up being a bit thicker than expected and blocked more natural light than I’d hoped. I decided to leave it up for a while to see how it felt in the space before making a final decision.
Next up was wallpaper.

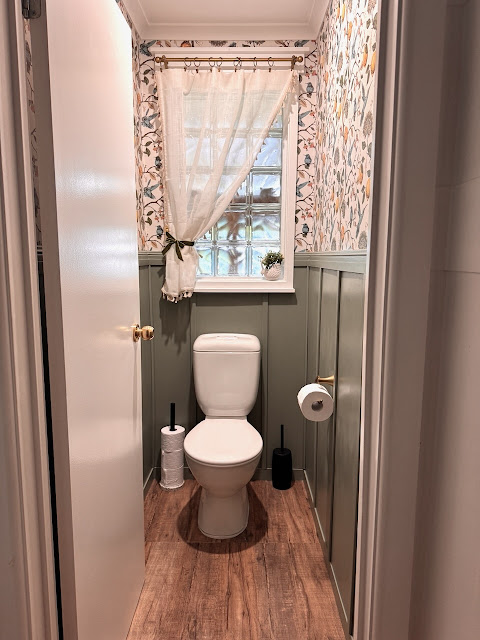
To give the room personality, I chose a bold vintage wallpaper from Temu that instantly transformed the space. If you’re looking for an easy way to elevate a small bathroom, wallpaper is a game-changer. I went with a colourful, patterned print that feels both nostalgic and playful.
Wallpaper in a toilet room or powder room is ideal because it makes a big impact in a small space—and it's less expensive than papering a full-size bathroom.

While I was waiting on the rest of the wallpaper to arrive, I decided to attach all the boards.
I also gave our silver toilet roll holder a quick update by spray painting it a dark gold. It was a simple DIY that added a touch of warmth and tied in nicely with the vintage-inspired accents in the room.
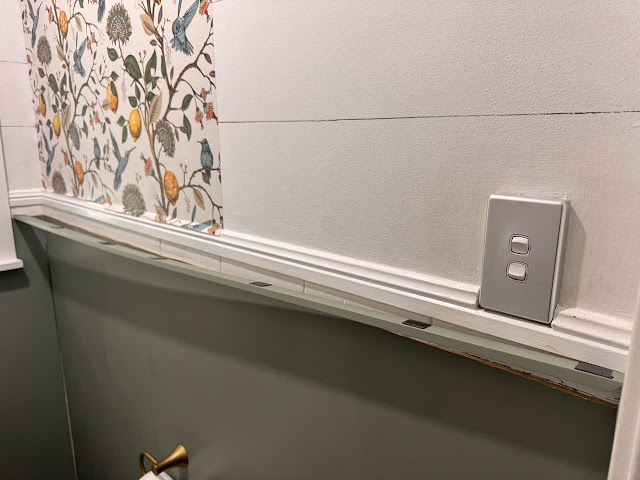
Next I cut, painted and adhered my upper moulding.

And caulked the bigger seams.

Then I measured, cut and painted the side strips for the wall.

I spaced them approx 40 cms apart with 3 on each side wall and two on the back.
From the very beginning I decided to put my back wall together in 3 parts. This allowed me to fit around the wall pipe. Adding the strips of moulding on the back wall covered the seams perfectly.

I also used corner moulding in all the corners to hide the seams.

At first, I wasn’t sure whether to paint the top and bottom moulding. I felt that if I painted the wall moulding, I’d also need to paint the window frame to keep everything cohesive. But in the end, the bright white at the base of the walls felt too stark against the new design. So I taped off the floor and painted the skirting to match the wall colour—and it made a huge difference in softening the overall look.

Next, I removed the existing curtain rod and brackets for a quick refresh. I ordered some brass curtain clips and gave the rod and brackets a new look with a coat of spray paint to match. The result was a more cohesive and elevated finish that tied in beautifully with the rest of the vintage-inspired details.

By dividing the curtain in half and tying each side back, I was able to let in much more natural light—brightening up the space while maintaining privacy. This simple window curtain styling trick is perfect for small bathrooms looking to maximize light.

I still wasn't 100% sure about the curtains so I ordered another more sheer one from Temu which allowed in more natural light to this small room.
Around the same time, I installed the rest of the wallpaper. I ordered 10 meters, which turned out to be more than enough—plenty left over for future projects. I’m considering using some of the leftover paper inside the vanity drawers for a fun, unexpected pop of pattern in the bathroom.


I also discovered these elegant swan-shaped curtain hooks on Temu and added one to easily tie back the new curtain, adding a charming finishing touch to the window.


For the tieback, I chose a green velvet ribbon to add a soft, luxurious touch.

I discovered this charming little swan at a thrift store and added some faux greenery for a fresh, decorative touch. It also works perfectly to hold and discreetly hide an air freshener.

The toilet roll holder reattached seamlessly to the wall and looks fantastic against the green-painted walls.

To enhance the overall look, I gave the light switch cover a fresh coat of spray paint to match the toilet roll holder.

I also upgraded the door hardware with a new gold door knob and coordinating door plate, adding elegant gold bathroom accessories that perfectly complement the vintage-inspired design.

Here’s the view with the door closed. While I briefly considered painting the door, I decided to keep it white to maintain a crisp contrast and to match the white window frame—adding a clean, cohesive look to the bathroom design.
For an affordable DIY hardware update, I purchased some Antique Gold Rub ’n Buff to refresh the door hinges. Although new hinges were an option, they were quite expensive, and since the hinges wouldn’t be frequently handled, this budget-friendly solution should keep them looking great for a long time. This simple touch helped elevate the overall bathroom renovation without breaking the bank.

I’m really pleased with how our vintage bathroom makeover turned out. The toilet room now strikes the perfect balance between classic vintage charm and a fresh, bold design. This small bathroom renovation truly transformed the space into something stylish and original.
All the wall panels completely covered the original white tiles, creating a seamless new look. I installed them using strong double-sided tape to ensure easy removal if I decide to update the space again in the future.
The wallpaper I chose is also removable, as are the peel-and-stick floor tiles, making this a perfect temporary bathroom makeover solution that’s both stylish and flexible.
Here is a breakdown of what I purchased and the costs.
Materials
Floor tiles Peel and Stick from Bunnings - $80
Lower moulding from Bunnings - $20
Upper moulding from Bunnings - $12
Corner moulding - $13
Side Moulding - $31
Clear varnish for floor and walls from Spotlight - $14
Paint - Porters Olive Grove - 4 x 6 = $24Scotch Extremely Strong Mounting Tape 2.5cm x 10.1m 414 long, Black
from Amazon - $27
MDF sheeting - Repurposed from entryway Sharpie Shiplap
Wallpaper from Temu - $53 (13 metres x 40 cms)
Curtain from Temu - $18
Brass Curtain Rings from Amazon - ($18 for 40) 10 for $4.50
Gold and Bronze spray paint - Already had
Swan curtain holder from Temu - $3
Door Knob from Bunnings - $17
Total - $237
A highly budget-friendly makeover that delivers a big impact without breaking the bank.
It’s been a few weeks since our toilet room makeover, and I’m still loving the fresh, vintage-inspired look.
Next up is the main bathroom renovation. Since all the walls are tiled to the ceiling, adding wallpaper won’t be straightforward unless I fully cover the tiles with sheeting. It’s definitely a challenge, so there’s lots to consider and plan as I prepare for this next bathroom renovation project.
Julie :)

Comments
Post a Comment
Did you enjoy this post? Please leave a comment.